Niko Home Control is evolving into MOTIV Building Control. MOTIV is a new brand for intelligent building automation. Built on the trusted foundation of Niko Home Control, MOTIV solutions are designed to make buildings work more naturally for the people inside them. MOTIV helps professionals create smarter, more comfortable buildings. With technology that works quietly in the background. All existing Niko Home Control solutions remain fully compatible with MOTIV. Over time, the full portfolio will move to the MOTIV brand. During this transition, you will see both Niko Home Control (NHC) and MOTIV Building Control (MBC) appear in this documentation. Discover MOTIV at niko.eu/MOTIV
Hardware Manual
English Danish Dutch French German Slovak Swedish

Installing the connected socket outlet

Signal range

The operation of devices with a remote control, such as a TV or video and audio devices, is not disrupted by a Zigbee® connected socket outlet. The indoor range is ± 10 m. In open spaces, the range reaches 30 m. The range of the  Zigbee® connected socket outlet depends on the materials used in the residence.
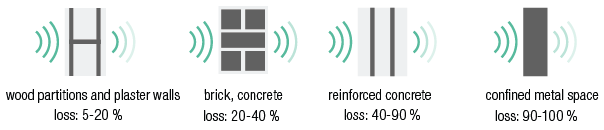
https://s3-eu-west-1.amazonaws.com/guideimages/HWScreenshots/V2.0/EN/58-00-002.png

  • Also respect a minimum distance of 2 m between a Zigbee® device (including the smart hub) and another RF transmitter (for example a Wi-Fi device) or devices such as motors, pumps, electronic LED transformers, solar panel inverters, home battery storage ...

  • More information see Zigbee® network principle.

Wiring

Switch off the mains.

Manual use

Connected use

https://s3-eu-west-1.amazonaws.com/guideimages/HWScreenshots/V2.0/EN/PM170-33505-029.png

https://s3-eu-west-1.amazonaws.com/guideimages/HWScreenshots/V2.0/EN/PM170-33505-004.png

Installation

Switch off the mains.

Pin earthing

Side earthing

Action

https://s3-eu-west-1.amazonaws.com/guideimages/HWScreenshots/V2.0/EN/PM170-33505-005.png

https://s3-eu-west-1.amazonaws.com/guideimages/HWScreenshots/V2.0/EN/PM170-34505-003.png

Insert only 1 electrical wire per terminal (i.e. max 2 wires per pole contact).

Apply a wire stripping length of 10 - 12 mm.

https://s3-eu-west-1.amazonaws.com/guideimages/HWScreenshots/V2.0/EN/PM170-33505-006.png

https://s3-eu-west-1.amazonaws.com/guideimages/HWScreenshots/V2.0/EN/PM170-34505-004.png

Mount the connected socket outlet in a vertical wall respecting to the up-marking

https://s3-eu-west-1.amazonaws.com/guideimages/HWScreenshots/V2.0/EN/PM170-33505-007.png

https://s3-eu-west-1.amazonaws.com/guideimages/HWScreenshots/V2.0/EN/PM170-34505-010.png


https://s3-eu-west-1.amazonaws.com/guideimages/HWScreenshots/V2.0/EN/PM170-33505-008.png

https://s3-eu-west-1.amazonaws.com/guideimages/HWScreenshots/V2.0/EN/PM170-34505-011.png


https://s3-eu-west-1.amazonaws.com/guideimages/HWScreenshots/V2.0/EN/PM170-33505-009.png

https://s3-eu-west-1.amazonaws.com/guideimages/HWScreenshots/V2.0/EN/PM170-34505-012.png


  • Claws can be removed with a screwdriver without removing the screws.

  • The connected socket outlet only switches the L-wire towards its pole contact. The N-wire will not be switched.

  • Use the paint protection cap 170-00099 if you are painting the wall where the connected socket outlet is installed.